Firmware Update for Storage Controller on HP ProLiant Server on ESXi Host

In this blog post, I will walk you through a step by step process on how to install a firmware update of Storage Controller on HP ProLiant Server which is running VMWare vSphere 6. Hope this will help someone at any point of time

Step1. Getting the Firmware

  1. Go to www.hpe.com
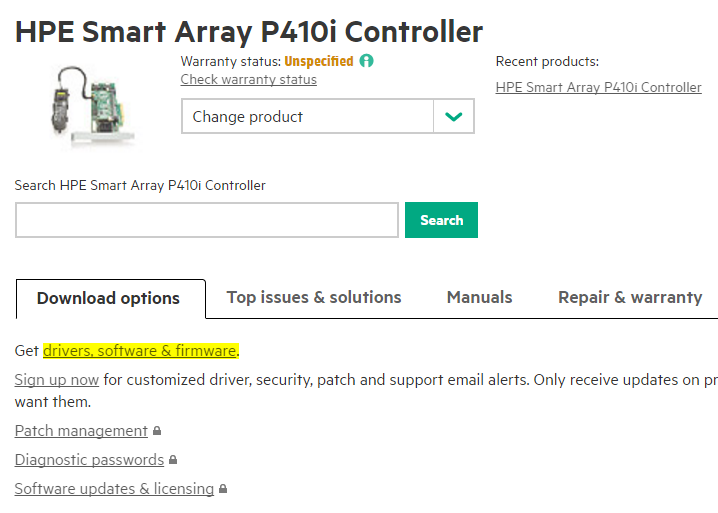
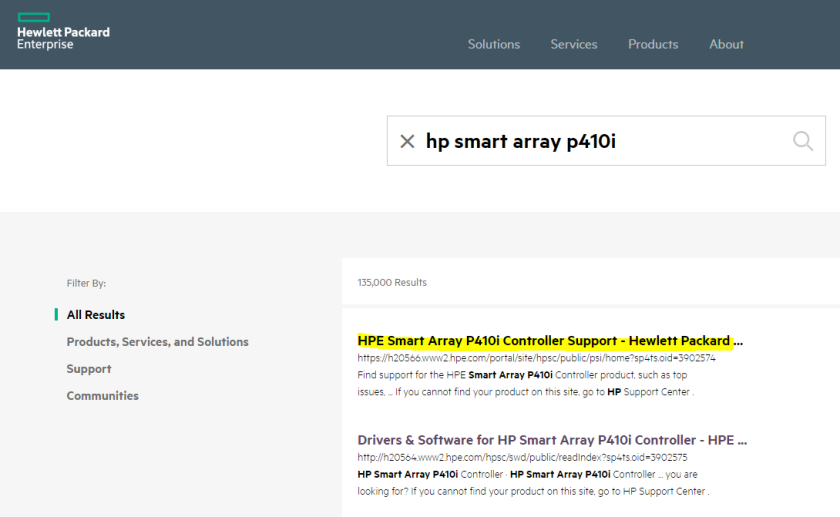
  2. In the search bar, type the name of the compenent. I am trying to download the firmware for HP Smart Array P410i
    01
  3. From the ‘Download Options’ tab, click the link for Get drivers,software & firmware
    02
  4. Download the firmware from the section ‘Firmware – Storage Controller’The name of the file which is downloaded will be something of the format CPnnnnnn.zip
    03

Step2. Upload the firmware to ESXi datastore

Upload the firmware which was downloaded to the ESXi datastore
04

 Step3. Run the Firmware Installer

 Before proceeding, create a folder in datastore with a suitable name and go to that directory. In the example below, I unzipped the contents to the root itself

 After unzipping, grant execute permission for the extracted vmexe file using ‘chmod’

05

Run the installer

06

That’s it. Reboot the ESXi host.

High Availability, Disaster Recovery and Business Continuity

These are the three golden words which everyone is considered about when thinking about the IT Infrastructure. But, these three often confuses the beginners. Is there really a difference between High Availability, Disaster Recovery and Business Continuity? All are based on the same concepts. I personally had this doubt when I heard about these things during the initial days. For some days, I started thinking about these words more often and became interested in the concepts and the importance of these three terms. This is a brief post which might help the beginners to understand the underlying meaning of these concepts.

High Availability

The term High Availability (often abbreviated as HA) is defined as an automated system, which will automatically failover the services from one node to another in the event of a failure. In this case, the failover process is initiated automatically. The time taken for this failover process to happen is minimal (approximately Zero) and there is no downtime incurred to the service. Clustering is one such high availability technique. In Windows Infrastructure, most of the high availability techniques are dependent on Windows Clustering. With this technique, high availability is achieved at the underlying hardware level, storage level, operating system level and ultimately to the service. The most important fact is that, we don’t expect a data loss during this. Another important thing to be noted in High Availability technique is that, there are no ‘Replication Mechanisms’ that is adopted for this technique. This is obvious. Because, if the data is to be replicated from one node to another and if some failure occurs to one node at any point of time, the most recent data will not be replicated to the second node (or other members of the cluster) which will result in Data loss.

Disaster Recovery

In the event of a Disaster Recovery, we do expect data loss. There are some criteria which defines the Disaster Recovery Technique. These terms are defined below.

RPO – Recover Point Objective

This defines the last possible accepted state of the system, to which it can be recovered to. This is usually based on the SLA of the service. Take the case of a backup. If the backup is scheduled daily at 9 PM, the last possible accepted state of the system will be 24 hours (worst-case). This is because, the backup is happening only after 24 hours. If the backup is scheduled every 3 hours, the Recover Point Objective will be 3 hours.

So, it is evident that the RPO is measured against time (usually hours), and it defines the acceptable amount of data loss, which the system can withstand. So, based on the criticality of the service/application the RPO will be different. This is something which needs to be mutually agreed with the client/management for the services in consideration.

Sometimes, based on the nature of the disaster the system might require to be started from a recovery site, which is in a different location geographically. So, the data in the primary site would be replicated to the DR site. This replication might be on a daily basis, or weekly basis. RPO will also change according to that.

RTO – Recover Time Objective

This defines the time within which the System is back into production. But, it is not mandatory that once the system is back online, it is good to start/resume the service. After the system is made back online, we would need to re-install/restore the data from backup, test the functionality and might need to do some tweaks to bring the system back into production. RTO is also measured in time (usually hours/days). RTO is also termed as RTA (Recovery Time Actual) in some cases, but as per my understanding both are the same.

So in the case of Disaster Recovery (DR), it is evident that there is some sort of replication that is taking place. From one site to a different site, may be.

Business Continuity

This is a set of rules/strategies, which anticipates the impact of the service on the business and to be followed so as to restore it at the earliest and with minimal impact. This is usually done through a BCP (Business Continuity Planning) process, which considers different levels of disaster that can happen to the IT Infrastructure and the appropriate strategies to be followed based on the outcome of it.

FSMO Roles explained

Active Directory is the first word that that comes to the mind when thinking about Windows Servers. And the Spinal Cord of Active Directory is of course the FSMO (Flexible Single Master Operations) roles. The FSMO roles are has other names like

  • Operations Master
  • Operations Master Roles
  • Single Master Roles
  • Operations tokens

There are 5 roles, which makes up the FSMO roles each having its own well defined functionalities. This stresses the reason why the 5 roles are separated and signifies the importance of no two Domain Controllers performing the same roles simultaneously. These 5 roles can be again classified into two – Forest wide & Domain wide.

The Forest Wide roles shall run only in one server across the Forest. Similarly, Domain Wide roles shall run only in one server across the domain.

The second statement made above is flexible though. The number of Domain Controllers is scalable as required, purely based on the number of users, redundancy and the physical locations spanned across. In this context, there can be more than one Domain Controllers, holding the same Operations Master roles in a Domain. But, this is applicable only to the Domain wide roles.

Forest wide roles

  1. Schema Master
  2. Domain Naming Master

Domain wide roles

  1. RID Master
  2. PDC Emulator
  3. Infrastructure Master

A detailed understanding of all the 5 roles is given below.

  • Schema Master

The Domain Controller holding the Schema Master role is required for maintaining the schema of the entire forest. Schema contains the attributes or properties of each object of an Active Directory object. To elaborate, an Active Directory User object has many attributes or properties like ‘First Name’, ‘Last Name’, ‘Organization’, ‘Logon Name’ etc. That means, the schema decides or contains what all ‘tabs’ and the fields that should appear under each tab when the properties window of an Active Directory User object is opened. Hence, the domain controller that holds the Schema master should be unique. Some applications require updating the Schema (Like Microsoft Exchange or Microsoft Lync). During such activities the Domain Controller which holds the Schema Master role should be available.

  • Domain Naming Master

The first rule in Active Directory environment is that, no two domains should have the same name in a forest. Same is the case when navigating downstream through the domains. No two machines should have the same host name within the same domain, but two machines can have the same host name if they are in different domains within the same forest. That will ensure that the FQDN (Fully Qualified Domain Name) is different for the two machines. Domain Naming Master maintains uniformity across the forest, ensuring that the names are different for each object. In that case, can two user objects have the same name?

  • RID Master

RID stands for Relative Identifier. The RID Master is responsible for the generation of a unique identifier for each object in the Active Directory Domain. All active directory searches and transactions happen within the domain based on this relative identifier. The Relative Identifier for an Active Directory User object is called Security Identifier (SID). The reader should now get the answer to the above question – can two user objects have the same name? Of course yes. For user objects, the uniqueness is followed based on the Security Identifier.

To maintain integrity in the SID generated by the Domain Controllers across the domain (any Domain Controller can create a user account), the RID Master of the domain will allocate unique pools of RID’s to each Domain Controller. This can ensure that no two RIDs generated by  Domain Controllers are the same.

  • Infrastructure Master

The Infrastructure Master is useful in cross-domain reference. A user in one domain can access resource in another domain, if there is a trust established. A two-way trust is automatically created if the two domains are within the same forest. In that case, a security group or a distribution group can also be created, comprising users of different domains. After creating such a group, suppose that an attribute like ‘Last Name’ of a user object is changed. The same user object is still referenced in a group which is in another domain. The Infrastructure Master role validates these changes and keeps the membership updated. To understand this, consider the below multi-domain forest scenario below.

  1. User1 who is a member of domain1.com (user1@domain1.com)
  2. User1 is a member of group1, which is created in domain2.com (group1@domain2.com)
  3. User1 is renamed later to User2 in domain1.com (user2@domain1.com)
  4. The change is propagated across all the GCs in the forest (specifically to the GC in domain2.com)
  5. The Infrastructure Master compares these information with the GC in domain2.com
  6. The Infrastructure Master in domain2.com detects the change that has happened to the user object user1 and update the group1@domain2.com with the updated information
  • PDC Emulator

The PDC (Primary Domain Controller) Emulator has the major and critical roles of the Active Directory environment. The PDC emulator opens connection to the writable domain controller and hence it is very important. Some of the important functions of the PDC Emulator are as mentioned below.

Ensuring backward compatibility – for environment running Windows NT 4.0, and older versions of Active Directory like Windows 2000

Updating/replicating Password changes – Ensuring that any password resets are replicated quickly to the other domain controllers in the domain

Managing the Group Policies configured

Acts as the primary time source for the domain – All the machines in the domain synchronize time with the PDC emulator

Move System Database to new location

Move Database File paths of System
Database

There are 4 System Databases –  Master, Model, msdb and tempdb. To move the database path of model, msdb and tempdb, follow the below steps. But, prior to moving the msdb database, check whether service broker is enabled. This is required if database
mail
is enabled on the SQL Server. To check whether service broker is
enabled, Open SQL Server Management Console, and click New Query. New Query Window will be opened.
Enter the below SQL Query.

SELECT is_broker_enabled
FROM
sys.databases
WHERE name = N’msdb’;

If the output is 1,
it means that the service broker is enabled.

To move the
database file paths of the above said 3 system databases, execute the following
Queries. The below queries assume that the new database file path is D:\SQLData.

Alter DATABASE model MODIFY FILE (NAME
= modeldev , FILENAME = ‘D:\SQLData\model.mdf’ )
Go

Alter DATABASE model
MODIFY FILE (NAME = modellog , FILENAME = ‘D:\SQLData\modellog.ldf’
)
Go

Alter DATABASE msdb MODIFY FILE (NAME = MSDBData ,
FILENAME = ‘D:\SQLData\MSDBData.mdf’ )
Go

Alter DATABASE msdb MODIFY FILE
(NAME = MSDBData , FILENAME = ‘D:\SQLData\MSDBlog.ldf’ )
Go

ALTER DATABASE
tempdb MODIFY FILE (NAME = tempdev, FILENAME =
‘D:\SQLData\tempdb.mdf’);
GO

ALTER DATABASE tempdb MODIFY FILE (NAME =
templog, FILENAME = ‘D:\SQLLog\templog.ldf’);
GO

After executing the above steps, a warning message will be received, indicating that
the change will take place only after the next restart of the SQL Server. Stop
the SQL Server from the SQL Server Configuration Manager which can be opened
from Start –> All Programs –> SQL Server –> SQL Server Configuration
Manager.

Copy the msdb.mdf, msdblog.ldf, model.mdf,
modellog.ldf, temp.mdf, templog.ldf file to the new
location

Start the SQL Server from the SQL Server
Configuration Manager (or from the Services console from Run -> ‘services.msc’)

Open SQL Server Management Console and verify the file path as mentioned above

To move the database file path of master database, follow the below steps. Master Database should be dealt with with utmost care, because the SQL Server instance will not start if something happens to this database. Master Database contains information of all the databases, including user Databases.
1. Open SQL Server Configuration Manager
2. Right Click the properties of the SQL Server Instance
3. Select Advanced tab
4. Modify the value of ‘Start Parameter’ to
‘-dD:\SQLData\master.mdf;-lD:\SQLData\mastlog.ldf’
5. Stop the SQL Server service from SQL Server Configuration Manager
6. Start the SQL Server Instance in master-only recovery mode. To do this follow the steps below
Open Command Prompt and enter the command: NET START MSSQL$GLOBAL /f /T3608
(The parameters are case sensitive)
7. Change the location of the resource database. The resource database should be in the same folder as that of the master database. To move the resource database, execute the below queries.

ALTER DATABASE mssqlsystemresource 
MODIFY FILE (NAME=data, FILENAME= ‘D:\SQLData\mssqlsystemresource.mdf’);
GO

ALTER DATABASE mssqlsystemresource 
 MODIFY FILE (NAME=log, FILENAME= ‘D:\SQLData\mssqlsystemresource.ldf’);
GO

8. Clear the query window and execute the following command to set the resource database as read-only

ALTER DATABASE mssqlsystemresource SET
READ_ONLY;

9. Restart the SQL Server from SQL Server service from SQL Server Configuration Manager
Extend the evaluation period of Windows Server 2008 Operating System

Microsoft is undoubtly the choice of enterprises. There is no technology which the giant hasn’t touched. Most people who would like to explore these new technologies would need to install Windows Server 2008 operating system, and test the technologies. Also, in the testing phase, it is advisable to the install the operating system as evaluation period or grace period. In short, we might need to install the operating system without activating the license in the server.

After installing the operating system as “Trial”, by default, the evaluation period is for 60 days. What if you haven’t finished your testing/learning in 60 days? There is no need to install the operating system again, do the configuration from the beginning. You can actually extend the evaluation period or grace period.

Two commands can actually do this.

1. Open an elevated command prompt.
2. Type the command ‘slmgr.vbs -dli’ (slmgr.vbs is a vb file in C:\Windows\System32 folder)

Guess what???? You are done. Your evaluation period has been extended. Good Luck.!!!!

Registry Root Keys

Everyone who has been working on a computer might have faced some types of problems. Under such situations, you might have googled to find a solution to your problem. Finally, you find out a solution in one of the microsoft support page. To the best part of it, the support page advices you to modify certain registry values. Nevertheless, the support page also puts a warning message identical to the one below.

WARNING: Using Registry Editor incorrectly can cause serious problems that may require you to reinstall Operating System. Microsoft cannot guarantee that problems resulting from the incorrect use of Registry Editor can be solved. Use Registry Editor at your own risk.

Now, you are in a real dilemma… Should I or shouldn’t I……. In this post, I intend to give the readers a brief idea about the Registry Root Keys.

If you open the Registry Editor (Start –> Run –> regedit), you can see the following five Registry root Keys.

1. HKEY_CLASSES_ROOT
2. HKEY_CURRENT_USER
3. HKEY_LOCAL_MACHINE
4. HKEY_USERS
5. HKEY_CURRENT_CONFIG

Let me tell you about these five classes now.

First, HKEY_CLASSES_ROOT.
This can be considered as a pointer or reference to HKEY_LOCAL_MACHINE\Software\Classes. If it is a reference, then why do we need such a root key itself? A genuine question for a normal man. This class is generally used by the developers, since they are mainly filled with information with regard to the applications, file associations etc.

Also referred to as HKCR

HKEY_CURRENT_USER
This node contains information related to a user account that exists in the computer. Information regarding the mapped network drives, etc are stored in this hive.

Also referred to as HKCU

HKEY_LOCAL_MACHINE
This node contains information of the computer. You should understand that the registry settings under this hive is applicable to all the users logging in to the computer. Hence, any settings configured under this node will be applied to all the users logging in to the computer. Eg. If USB is disabled in HKEY_LOCAL_MACHINE, it will remain disabled for all the users logging in to the machine.

Also referred to asHKLM

HKEY_USERS
This hive contains settings retrieved from the group policy object. Group Policy is one central tool, which a Server Engineer will use to define certain specific settings to a group of users/computers. The settings applied to the users will be contained in this registry hive. When a user login to the computer, these settings are copied to HKCU registry hive. If you expand this registry hive, a folder called DEFAULT can be seen. This folder contains all the settings which are global to all the users. Other than the DEFAULT folder, you can also see many other folders, whose names are actually the SID’s of different users. (In Windows machine, each logon account has a unique SID). Each of these SID folders contain the settings which are unique to each of the users.

Also referred to as HKU

HKEY_CURRENT_CONFIG
This registry hive contains all the profile settings under which the computer is turned on now. This is also a pointer or reference to HKLM\System\CurrentControlSet001.

Also reffered to as HKCC

Hope this has been of some help to you. I would be happy to believe that I was able to spread atleast a little bit of knowledge to everyone who read this article. All  your comments are welcome.

Delete old transaction log files in Exchange 2010

Hi,

As the first post, I would like to share the world on how to delete the old transaction logs in an Exchange Server. Before starting, one should understand what transaction logs are. The transaction logs simply are logs of what all activities an Exchange Server has done. These logs are very important because, in the event of a recovery the logs will be very much helpful for the database to recover. Also, the exchange database will be committing (Saving) all the activities one by one at a time. So, what happens if 100 users tries to send out a mail at a time? Would you expect the database to save the activity one by one and send the mails? No way……. The mails will be sent then and there. The activities will be saved in the transaction logs. The database will commit the logs one by one……….

These logs can eat up a lot of space from the Exchange Server. Microsoft recommends not to manually delete the logs. The backups will be able to do that. In fact, if you have an Exchange aware backup, you have the option to tell the backup solution to save the logs, and flush the old logs. But, sometimes if the backup is failing………. The logs will not be committed, and the disk space will be full. The mailbox database will be dismounted automatically. The server will not respond. All the top guns, who have their mailbox on your server will be freezes. You need to recover as soon as possible…. One option is to run the backup manually, so that the backup job can flush the old logs, and free the space. But, you don’t have time.

The last resort is to manually delete the logs.

Requirement:

1. You must be a Server wide administrator

2. You must know the folders where

a. Microsoft Exchange is installed
b. Transaction logs are saved in the server (Say, C:\MDBDATA\MDB01)

Step 1. Open an elevated command prompt, navigate to the ‘bin’ folder in the directory where the Exchange server is installed. It can be in ‘C:\Program Files\Microsoft\Exchange Server\V14\bin’.

Step 2. Use the eseutil command.

Open the folder in which the database transaction folders are saved. There will be a file with the extension ‘.chk’. This file will keep track of the log file up to which the mailbox database has committed.

C:\Program Files\Microsoft\Exchange Server\V14\bin> eseutil /mk “C:\MDBDATA\MDB01\E00.chk”

The result will be having a value like
Checkpoint: (0x4B1D,FFFF,FFFF)

Only the first parameter will be our interest.

0x4B1D

Step 3. Open the folder in which the transaction logs are saved. Arrange the files on the basis of the ‘Modified Time’. Find the logfile, whose name ends with 0x4B1D.

Step 4. Now, you can delete all the log files above the one identified in Step 3.

After manually deleting the old file, initiate a full backup manually. Because, both incremental and differential wont be of any use at this time, since the log files were deleted by you.

Hope this will help you in a very crucial situation. Please feel free to send in you comments to tomjacobchirayil@gmail.com.